How to Make a DIY Driftwood Orb

Make a DIY driftwood orb for your home decor! Driftwood nautical decor is so pretty in coastal homes. Try this fun craft driftwood table decor for your home. For more fun DIY’s see my DIY Home page.
Lately, I have been a contributing blogger on the FloraCraft® Make It Fun Blog. I am now going to start sharing some of those posts on my own blog. Yay!
This orb has become one of my favorite unique home decor pieces. I am in love with driftwood these days.
Disclaimer: Please note that some of the links below are affiliate links and at no cost to you I will earn a commission if you purchase through those links. See my Disclosure + Privacy Policy for more info. As an Amazon Associate, I earn from qualifying purchases.
⚡️NOTICE: Submitting forms for FREEBIES on this site too quickly can trigger our email spam filters. If you stop receiving your Freebie Delivery Emails, please try using a different email address, an incognito window, or you can Contact us to whitelist your email so you can receive them.
Coastal decor is all the rage these days. Unique shells and other items found while strolling down a serene shoreline are some of my favorite things to decorate with.
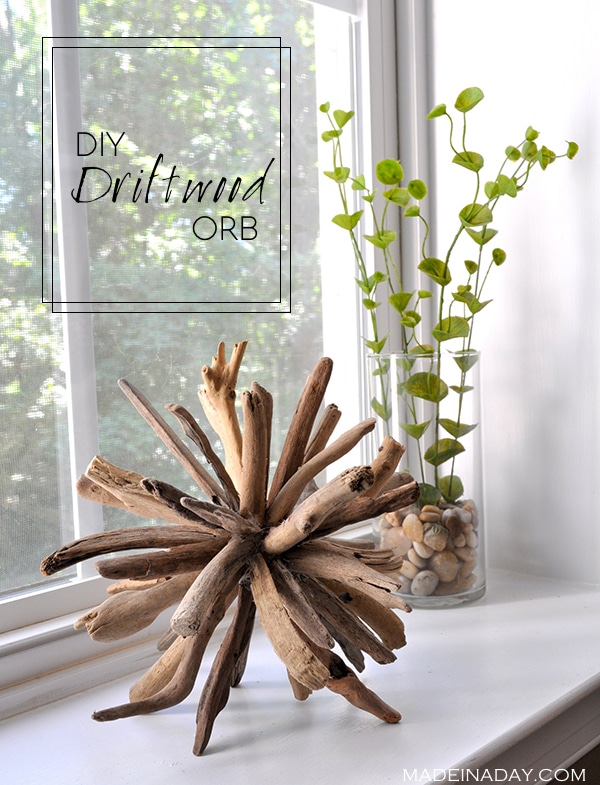
The worn look of driftwood is a classic way to display rustic beauty with the latest trendy beachy vibe.
Let me show you how to make this simple but beautiful driftwood decorative balls using a small foam ball and driftwood chips.
How to make a DIY Driftwood Orb
Supplies:
- 1 Floracraft® Make It: Fun® Foam Ball: size 1 1/2 inch
- Drift wood pieces or chips
- Low Temp Glue Gun & Glue

Instructions:
Separate the driftwood out on a table by size and length.

Press the wood gently into the foam ball to make an area for the wood to fit snug. Add hot glue to the end of the wood then press it back into the hole you created in the foam.

Hold each piece of wood until the glue is dry.

Continue gluing the longest pieces of driftwood first equally around the foam ball. Fill in empty areas with thick and wide driftwood pieces, continue until you no longer see any foam.
Add small thin driftwood pieces to fill in narrow areas of the foam ball. Display your orb and that’s it! Enjoy!

The Driftwood Orb is sure to be on trend addition to your home and a great conversation piece.
Love it? Pin it!


Shop the post with some of my Driftwood favs!


Hello from Rhode Island! My favorite past time is to comb the beaches, especially after a storm! Your orb caught my eye recently & today I created one! So easy & the end result outstanding! This project made my day! Thank you!
Thanks wonderful Tawny! Glad you found my project!
How long were your driftwood pieces (approximately)? My orb turned out way too big!
Hi Mo, My driftwood pieces were a bunch of different sizes. Some were 4 inches up to 6 and 7 inches. My orb was around 8-12 inches across when finished. So it was pretty big too. I hope this helps.
Kim, thanks so much for this beautiful DIY project! I’ve been wanting to use some of the driftwood from our lake property and this is perfect. So simple and so classy! I’ve put a copy of your image above on my website, with a link to this page and an encouragement for my readers to visit you here. Thanks again!
Thank you, Kim, for the awesome idea! I was inspired by yours and made one this weekend, which I love! It took me several hours, but it was really relaxing and fun to create!
well, darn, this was a big fail for me :( It looked like a simple, quick project. Not sure what happened. I used a traditional hot glue-it seemed to just melt the styrofoam so that it caused an airspace instead of a bond. Even though I held the pieces in place until the glue cooled, the driftwood was loose. I’m so sad-yours looks great!
Did you use a low melt glue gun? How long did you hold each piece?
Hi Karen,
Oh no, so sorry to hear your orb did not turn out so well. When you use hot glue with any foam you should use a low heat setting. All of my Floracraft foam posts say, low temp glue & gun, I am not sure why this one did not. I updated the post. You have to be patient with this piece since you have to use so much glue. Let the glue dry to solid before adding the next piece. I would try again with the same pieces of wood and a new foam ball.
Best,
Kim
Love your orb idea. I do beach crafts too. When I am using styrofoam, I paint it with two coats of household paint first. I use a sand color for shells and a driftwood color for wood. A pint of each has been my friend for about 3 years!!
Hi Kim! ..Love your driftwood orb idea! So cool..I myself live on Vancouver Island and spend time collecting all sorts of things off the beach to use in my crafts. Have you thought of hanging them? I find it fun to do as well ?
Hi Donna,
I am thrilled you liked my orb!! Hanging it would be awesome too. The wood makes it kind of heavy though and I am not sure the foam base would be able to stand it for long. Maybe if it had a stronger base. Great idea though! Glad you found me!
Kim
Hey, Kim! Just wanted to let you know that we loved your DIY Driftwood Orb so much when you shared it at the #HomeMattersParty last week, we’ve FEATURED it THIS WEEK! Hope you can check it out when you get a sec! Happy Friday!!!
~Lorelai
Very cool! We have tons of driftwood collected over the years, so I always love seeing new ideas to use it! :) Lisa
Thanks Lisa glad you like my orb! I had been hanging on to that driftwood for awhile.
Best,
Kim
I love this idea! Next time I have driftwood, I am making myself one. It would be the perfect vacation memento. #HomeMattersParty
Where do your ideas come from?! Such a clever why to use collected driftwood.
Ha thanks Erlene, and I am not sure. Sometimes they hit me in the craziest places. Shower.. middle of the night.. lol.
I love it! What a totally fun, unique piece!
Thank you Michelle. It has really become one of my favorite decor pieces.
Kim
I was wondering how on earth this was made when I first saw it. It looks so intricate as if it would be impossible to DIY but, it’s so awesome how easy it really is! Looks cool :)
I initially thought I may not have enough driftwood to finish the orb, it was like doing a puzzle where every piece has a place. It was really fun to make!
Kim