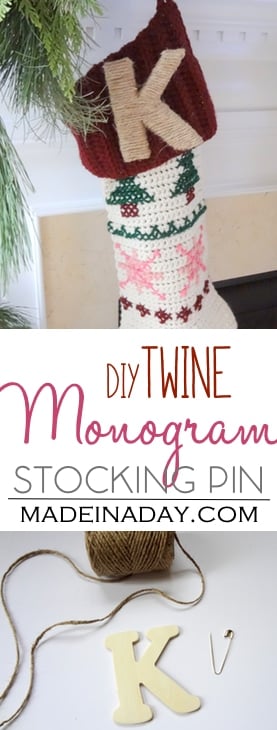
DIY Fabric Covered Letters For Christmas
Disclaimer: Please note that some of the links below are affiliate links and at no cost to you I will earn a commission if you purchase through those links. See my Disclosure + Privacy Policy for more info. As an Amazon Associate, I earn from qualifying purchases.
See how I make DIY Fabric covered letters with decoupage glue for the holidays! Cover paper mache letters with red felt and ball trim for fun Christmas decor. For more fun holiday tutorials see my Christmas page.
Tis’ the season! Today I am going to show you how to make these festive felt-covered letters for your holiday decor. I used Mod Podge decoupage to adhere the felt to the paper mache letters.
I have a deep love of dingle ball trim that stems from my childhood bedroom, back then my mother was quite the seamstress and covered everything in the room with them. When I found this fun green trim I knew it would be the perfect accent for these fun letters. Let’s get started.
DIY Fabric Covered Letters
Supplies:
- Cardboard letters
- Mod Podge
- Foam applicator
- 1 yard of Red felt
- 3/4 yard black trim
- 1 yard green dingle ball trim
- Small buckle
- Fabric scissors
- Hot glue & gun
- Rotary cutter and mat
Instructions:
Lay the letters on the felt and draw around the edges with a pen. Cut what you can of the letters with a rotary cutter. Trim the rest with fabric scissors. Cut out felt strips the width of the edges of your letters for the sides using a rotary cutter.
Coat the front of your letter with a thick amount of decoupage. Lay the felt on the front of the letter first, smooth out the edges.
Be careful not to get the Mod Podge on the felt in the front of the letter. Let them dry. Trim the excess fabric from edges.
Take the strips and decoupage them to the edges. This can be tricky with felt, just squeeze edges together as they are drying.
Touch up edges that pop up, being careful not to get on outside of felt. You may be able to see some of the decoupage glue when it is dry if you get it on the outside of felt.
Embellish them with trim using hot glue gun. And that’s it, you created your own holiday letters!
These are so sweet,featuring them this week. Thanks for linking up to Creative Mondays. Hope you can stop by again and link up this week? Merry Christmas :)
LOVE!! These letters are adorable!!
Thanks so much for sharing at Artsy Corner. Hope to see you again this week :)
So cute!! I like that you chose to cover them in felt (instead of paper)
These are so cute! Love both versions.
Saw you featured at Diamond in the Stuff
Debbie :)
LOVE! Pinning too!
I love them with the Santa’s belts! Plus, the red felt makes them so warm and fuzzy!
Featuring soon at Bacon Time! Thanks for sharing.
Thanks so much for linking to Make the Scene Monday @ Alderberry Hill. You are being featured later this evening!
Have a fantastic week ahead!
oh my goodness, such a simple upgrade and so perfectly beautiful!! thank you so much for linking up to our party, Kim!
How cute!!! Love that green pom pom garland. Great idea!
This is sooo cute! Simple and easy but so festive! I love the little green pom pom garland on the red letters! Found you at Pincushion creations!
that is so cute :) just did a “JOY” banner too…
found you at my romantic home’s show and tell friday! come and visit me back at:
https://homefor4sweethome.blogspot.com/
huggies***
rea
So darn cute!
Thanks for dropping by & linking up @ DearCreatives.com I love the holly jolly!
Love these so much! XO, Aimee
those are adorable! love the pom pom trim ones!
Really cute!
I am absolutely in love with your Holly Jolly letters! Thank you so much for sharing them at my party! Have a great week!
Leslie
House on the Way
How cute is that! Those look so easy to make, and they are too cute!
Those are so cute! Thank you so much for participating at SHOW-licious Craft Showcase!
https://sew-licious.blogspot.com
Marti
Adorable! Thanks for sharing. I love that you used a craft item that brings back fond memories, making it more special!
such a cute idea! I love the ones with the belt!
Thanks for linking up! I featured your post in my wrap up https://tidymom.net/2012/christmas-holiday-ideas/
Happy Holidays!
So much cute! I don’t which I like better, the belt or the poms around the JOLLY letters! So lovely!
This looks really nice with the little dangle balls!
This is a gorgeous project. I love the bold red and the clean lines!
WOOW….that is some great stuff….. :)
and do not miss…..
S
A
T
U
R
D
A
Y
S
H
O
W
O
F
F
it is FUN :)
WELCOME
HÃ¥kan ( The Roseman)
little pom poms made me smile!
hope you will find a moment to stop by and enter a giveaway i am hosting for followers (i hope you win!):
https://hellolovelyinc.blogspot.com/2012/12/personalized-lovely-giveaway.html
happy weekend to you!
michele
These are so cute! love them!
These are so cute!
I am inviting you to come and share this in my Show Your Stuff blog hop, the party runs from Thursday evening until Tuesday:
This is an awesome idea! Especially love the one dressed up like Santas!
Love such a fun idea!
Super Cute! I love decorating with Letters!
Wow, great work on the letters. Lot’s of work I’m sure but it paid off. Those are gorgeous.
Hi, Kim
Love your sign. Super easy and festive!
Thanks so much for sharing these on “I Gotta Try That” They are darlining, I love them!!! Just shared them on my Facebook page.
Marcie
https://www.facebook.com/pages/I-Gotta-Try-That/365876306807232?ref=hl
OMG, I LOVE these. Thank you for sharing.
That Santa belt one in the middle is too cute! Such an easy DIY too. Thanks for the inspiration!
What a fabulous idea!! So cute!!
Oh, those are so cute! Thanks for sharing! :-)