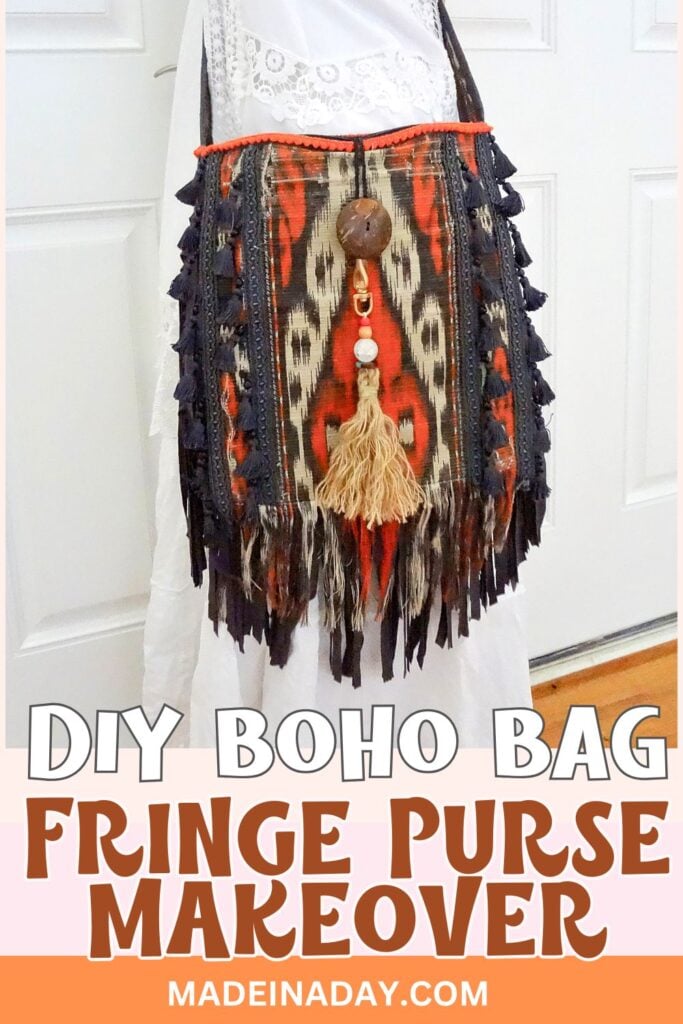
DIY Boho Bag Fringe Purse Makeover

Transform a festival crossbody into a boho bag chic accessory with a DIY Fringe Purse Makeover. Learn how to add fabric trim and DIY fringe to create a stylish, unique bag in minutes! For more fun ideas see my Crafts page.

Looking to add a little boho flair to your favorite bag? A DIY fringe purse makeover is the perfect way to transform a plain bag into a chic boho statement piece.
You could update an old purse or customize a new one by adding fringe! It is an easy and fun project that’s sure to turn heads. Plus, it’s a budget-friendly and sustainable way to revamp your wardrobe with a trendy, handmade touch!
Disclaimer: Please note that some of the links below are affiliate links and at no cost to you I will earn a commission if you purchase through those links. See my Disclosure + Privacy Policy for more info. As an Amazon Associate, I earn from qualifying purchases.
⚡️NOTICE: Submitting forms for FREEBIES on this site too quickly can trigger our email spam filters. If you stop receiving your Freebie Delivery Emails, please try using a different email address, an incognito window, or you can Contact us to whitelist your email so you can receive them.
Here’s How I Made Over My Bag
For my bag makeover, I added some, DIY fringe, upholstery tassels, tiny dingle ball trim, and one of my DIY Rope Tassels. This old hippie bag was a little worn out from tons of use, but now with the new groovy facelift, it is fabulous!!! I love it!!!
DIY Boho Bag Fringe Purse Makeover
Supplies:
- A plain purse or satchel
- Grey jersey knit t-shirt material or blouse. (I used a top I had in my closet for this tutorial).
- Blue tassel trim for upholstery or the home. Similar to this Trim
- Orange Mini Pompom Ball Trim
- Rotary cutter and mat, or sharp fabric scissors
- Hot Glue for Fabric & Gun
See my tassels page to learn how to make your own DIY tassels!
Instructions:

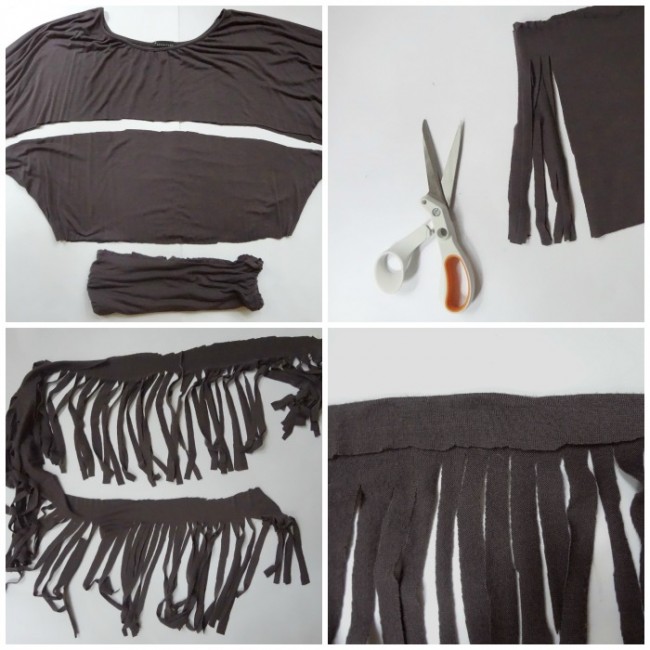
- Cut the t-shirt across the center with sharp scissors.
- I used the middle section of my top in the first pic.
- Cut one end open in the loop of the top.
- Cut long 5- to 6-inch strips into the fabric to make the fringe.
Fold the top fabric raw edge over the edge of the fringe strip and hot glue it down so you have a neat-edged hem. See the last pic.

Hot glue the fringe to the bottom and side edges of the bag.

- Work with the look of the purse you are using and plan ahead where to place your accents.
- Cut the pieces to the correct lengths before gluing them down.
- Add the fabric trim and tassel trim to the bag to highlight the style of the bag with hot fabric glue and a gun.
- Add the orange trim to the top edge of the purse with hot glue.
- Trim the fringe on the bottom of the purse to round out the fringe and that’s it!!
I love this makeover and can’t wait to wear this on vacation this year!

Styling Your New Fringe Purse
Your DIY boho fringe bag is the perfect accessory for festivals, casual outings, or vacations. Pair it with flowy maxi dresses, denim jackets, or crochet tops to complete a funky boho look.


LOVE IT? PIN IT!!

Your re-fashioned bag looks awesome. As soon as I read your post I dug up a loved-for-many-years, but now less exciting bag from a long ago trip to Guatemala, some left over pompom trim from a similarly long ago throw pillow project, an old tee shirt that never fit quite right and the remains of some green Rit and was on my way to refashioned fabulousness. I tea-dyed the pom poms to go with the aged look of the bag, dyed the shirt to better go with the green on the bag and then followed your wonderful instructions to make my old bag fun and stylish again.
I have do have a question for you though – has your bag ever gotten wet? And if so, what did you do to overcome the curling of the tee shirt fringe? My fringe looked awesome right after cutting it, but then it got wet and now all the little strands are curled up into tight little strings that look a little sparse and tattered. I still love my new old bag, but I’m hoping there’s a way to bring it back to its post-makeover glory.
Hi Elizabeth,
No, my bag has not gotten wet. You could though trim the scraggles and maybe iron the fringe back down smooth. Worse case scenario you could pull the jersey knit off and add more or trim the old down and glue new fringe right over the old fringe. I hope this helps! Spo glad you tried my re-fashion!
Kim
Kim…would you consider selling me you bag? I absolutely LOVE it!!!!!!
Hi Vanessa,
That’s s sweet that you love it! Unfortunately, my daughter owns it now. So I can not sell it.
Kim
I love this bag!! Would you consider making me one? I’d be happy to buy one it and I’ve never done this before. But it’s so adorable!
Thx, Diane
Hi Diane,
At this time I am not making these to sell. It is something I have considered, but not at this time. If I do they will be in an Esty store. So watch for that. Thanks so much for loving my bag and stopping by.
Kim
What a cool purse! Thanks for sharing at our Link it Or Lump it party.
This is amazing it looks like its straight out of the free people store! Great job! Thanks so much for linking up at the Creative Sparks Link Party. We are live again today so stop by and link up! https://bit.ly/1pEMI5A
Your “new” bag is fabulous! I love all the tassels. Thanks for sharing with Creative Spark Link Party. I hope you join us again tomorrow.
Glenna @ My Paper Craze
This is seriously adorable! Love it! Thanks for sharing over at Link It or Lump It!
I love how the purse came out. Great tutorial, I love purses and this one above is too cute!
Too cute! And great tutorial. Thank you so much for sharing at Tuesdays at Our home. Enjoy your day! Maria