Suede Tassel Bracelet

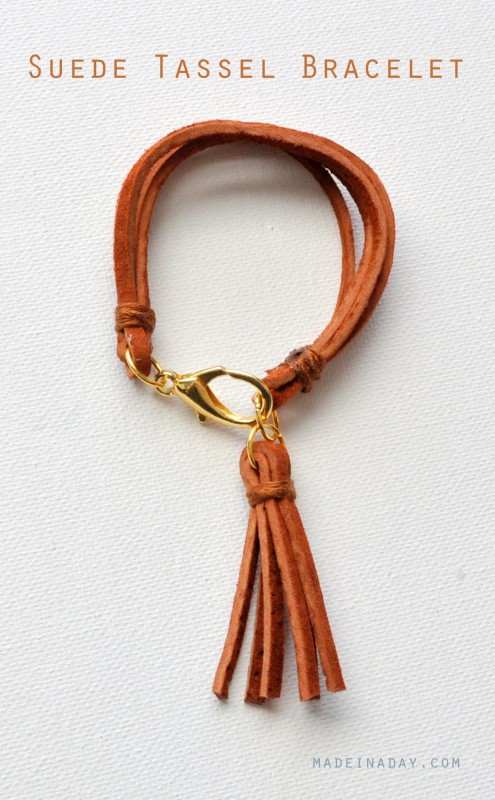
So far I have made tassels out of rope, embroidery floss and nylon string. Today I am going to show you how to make a leather tassel. This one is the simplest of them all to put together. I made this suede leather tassel bracelet to match my last post, the Suede Tassel Necklace. Let me show you how it’s done~
Suede Tassel Bracelet
Supplies:

Disclaimer: Please note that some of the links below are affiliate links and at no cost to you I will earn a commission if you purchase through those links. See my Disclosure + Privacy Policy for more info. As an Amazon Associate, I earn from qualifying purchases.
⚡️NOTICE: Submitting forms for FREEBIES on this site too quickly can trigger our email spam filters. If you stop receiving your Freebie Delivery Emails, please try using a different email address, an incognito window, or you can Contact us to whitelist your email so you can receive them.
- Medium Brown Leather Suede string, Brown Suede Lace
- 4 jump rings 7mm & one smaller
- Gold large Lobster claw clasp
- DMC Embroidery String #433
- Flat jewelry pliers
- Hot glue & gun
Instructions:
Cut a 22-inch piece of suede string. Your length may be larger depending on your wrist. Fold it four times and place over the wrist to see how big the bracelet should be. The ends should not touch. You can also make it larger by adding jump rings when you add the clasp.
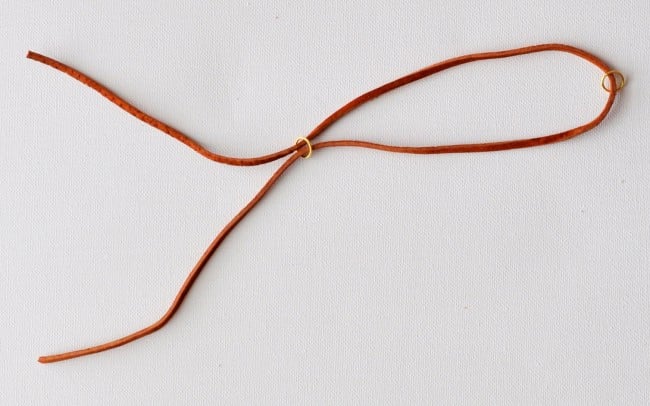
Add two jump rings to the string and feed one end of the string through twice. See image above.

Fold in half so there are four strings across the wrist. Pulling each jump ring to each end.
Pinch ends and tightly tie the ends in a double knot and wrap with embroidery floss. Add glue to secure the ends of the wrap.
For the Tassel:

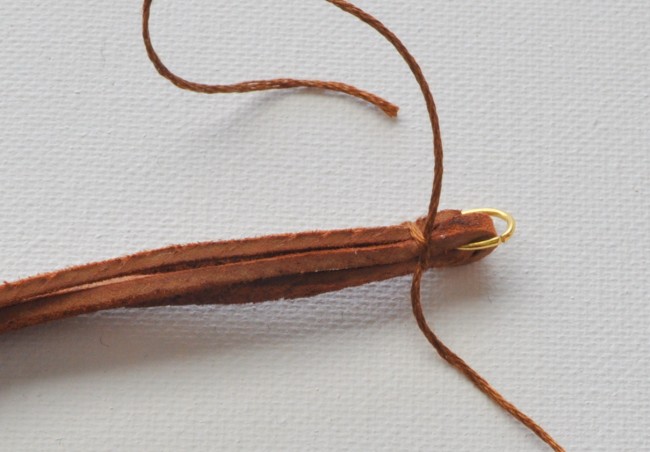
Cut three 4 1/2 inch pieces of leather string.

Feed them through a 7mm jump ring. Lay them neatly. I put two strings on the top and one underneath them.

Tie tightly with embroidery string as close to the jump ring as possible. Wrap knot with an extra string. Add a dot of glue to secure the floss.
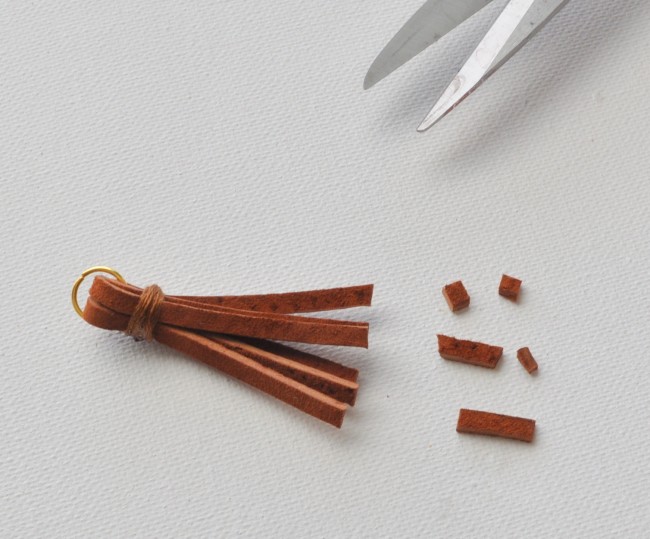
Trim the tassel. Cover the embroidery thread with another color for an extra pop!
Add the lobster claw clasp to one end. And another extra jump ring to the other end of the bracelet to size. Add the tassel and that’s it!

Super cute! This matching set would make a great gift for Mom on Mother’s Day or gift for any time of the year!
LOVE IT? PIN IT!

Check out my other Jewelry & Tassel Posts~

I’ve been admiring this for a while. Finally made one tonight. I wire wrapped the ends, rather than using embroidery floss. A 22 inch piece of leather folded four times, will only fit a wrist size of less than 6 inches, not a “typical “ sized wrist. I had to add additional jump rings in order to be able to close it. Unfortunately, I already cut additional pieces of leather to 22 inches. A 7 inch wrist will require at least 28 inches of leather.
It looks so lovely, you are very talented. I love how detailed the photos are, makes it easier for a rookie like me.
A very creative instruction! And I love that camel color a lot!
these are really cute. Thanks for sharing.
Great idea and great tutorial – Thanks for linking up to Pin Worthy Wednesday, I have pinned your post to the Pin Worthy Wednesday Pinterest Board.
Hi Kim – love this tutorial! But then I love all of your DIY ideas and tutorials ;o) Thanks for sharing and for linking up with the Thursday Favorite Things Blog Hop at Katherine’s Corner. Looking forward to what you’ll share next week at the hop! Nina @ Vintage Mama’s Cottage and Ruby for Women