Pom Poms Made Easy: Clover Pom Pom Maker Tutorial


Confused about how to use the Clover Pom Pom Maker? Then follow my step by step tutorial on how to make perfect pom poms in minutes. No forks or cardboard required. For more fun crafts visit my Easy Crafts page.

I have always been in love with pom poms and dingle ball trim. Back in the 70’s my mother made my childhood bedroom over with ball trim using her sewing machine. There were dingle balls everywhere! On my curtains, bedspread and even my lampshade. I get a little nostalgic when I see them.
I wanted to see how easy it is to make these cuties, and wow, after much research I realized there are so many methods to make them. From cardboard cut-outs, plastic molds to kitchen forks. But I just knew there was a product out there that would make the perfect pom.
Disclaimer: Please note that some of the links below are affiliate links and at no cost to you I will earn a commission if you purchase through those links. See my Disclosure + Privacy Policy for more info. As an Amazon Associate, I earn from qualifying purchases.
⚡️NOTICE: Submitting forms for FREEBIES on this site too quickly can trigger our email spam filters. If you stop receiving your Freebie Delivery Emails, please try using a different email address, an incognito window, or you can Contact us to whitelist your email so you can receive them.
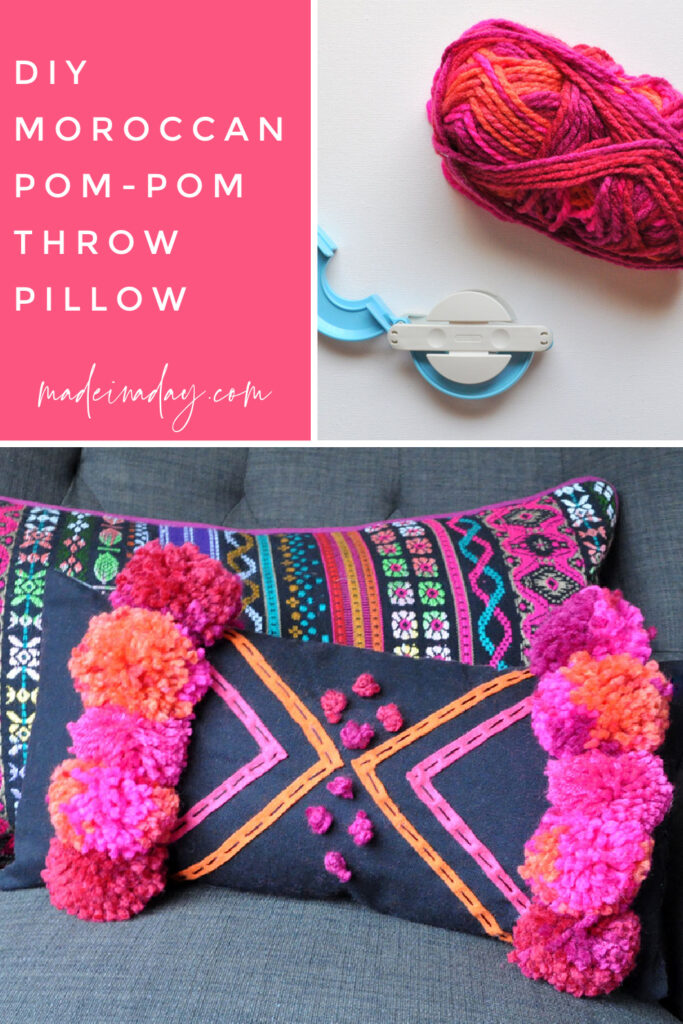
I turned to Amazon and there I found the Clover Pom- Pom Maker. This strange little gadget is so easy to use and you can whip these poms out a few minutes flat.
But let’s go back to what this post is about. I have to say, when I first tried the Clover Pom Pom Maker, the directions to me were very vague, so I turned to Youtube for a how-to video.
I don’t know if it was me, the pic tutorials, or the videos I watched, but I just didn’t get how to use this contraption to make pom poms. So confusing. After a few trial and errors, I finally figured it out.
For those of you who had a tough time with this like me, this tutorial is for you! Here is my version of how to use the Clover Pom Pom Makers. Hopefully, I made it a little clearer than some of the other online versions. So let’s go make a pom pom!
More Pom Pom ideas you will Love


Clover Pom Pom Maker Tutorial
Supplies:
- Clover Large Pom Pom Maker {shown is large 3-3/8in 85mm}
- Yarn
- Sharp scissors

Instructions:

Open the arms of Clover Pom Pom maker. Inside you will see two parts that are made to come apart in the center with a metal peg. Start with your pom maker as shown above arms opened and attached to the center.

Begin wrapping the yarn from the outer edge of one of the arms. Push the yarn towards the arm end to tighten the wrap as you go. When adding the yarn, you can wrap as much as you would like. The thicker you wrap the yarn the thicker your pom will be.
Once you reach the white center of the pom maker, start wrapping back over what you just wrapped, ending up back on the outer part of the arm.

Close the arm with the yarn on it. Continue wrapping your yarn onto the other arm. From the white base out. Make sure you wrap the yarn in the same amount of thickness as the previous arm. And like before, when you reach the end of the arm, wrap the yarn back towards the white part of the pom maker.

Now both side of the arms are full of yarn. Close the arm loops. Do not worry about the excess yarn ends, they will get trimmed off in the next step.

Holding tightly, place your scissors in the end groove of the pom maker and start cutting the yarn, going all the way around the circle.

Make sure all small yarn threads have been cut.

Cut a 6 inch or so piece of yarn for the tie {shown in pink}. Place the tie through the center of the pom maker. Pull the tie tightly and tie in a single knot. Turn the pom maker over and tie the tie again in a double knot.

Gently open each arm.

Pull the pom maker apart from the center releasing the pom.

Fluff your pom and trim the uneven yarn off with sharp scissors. Cut off the tie or use it to apply to other projects. And that’s it!

Although this looks like a lot of steps. Once you make one, it really only takes a few minutes to complete a pom. The poms are consistent in size and do not need much trimming like other methods. Now you know my new latest obsession! More to come!
MORE POM POM FAVS


Love it? Pin it!


Thanks so much for the tutorial on the clover pom pom maker, best one I found!! Now I get it !
Thanks, Sue
I would like hints on how to assemble a pom pom rug after I have finished all of the pom poms!r
Hi Bonnie,
I do not have a tutorial for that project. You could possibly tie the pom’s closely together onto rug utility netting fabric.
Kim
Thank you very much for joining in and making our Bowdabra Crafty Saturday Showcase, we will look forward to seeing your post next Saturday.
Warm Regards,
The Bowdabra Team
I love pom poms and am going to start a project on them soon. I can’t wait. Thanks for the tips. Your friend, Linda @ Crafts a la Mode
What an awesome project! I’m not sure I have introduced myself or not, but my name is Niki, and I’m one of your fellow Merry Monday hosts, and wanted to let you know that I love your blog and hope to catch up on several of your other projects this week, too! I noticed you commented on my blog, and must not have known I was a host also. I’ll be pinning to pinterest. Have an awesome week!
Thanks so much Niki! Nice to meet ya! Ha what did I say on your blog? Did I share a project? Ha I’m guessing I didn’t realize you were a host either! Thanks for the pin!
These are so cute! Thank you for linking up to the Merry Monday link party!
I have always loved pompoms too. Your tutorial and the pom pom maker, it looks too easy. Thanks for showing us this on the #HomeMattersParty
Kathleen
Thank you Kathleen for the sweet comment!
Kim
Great photo tutorial! I would love if you shared this at our Yarn Fanatic Party –
I need to get this pom pom maker asap! Thanks for sharing!
Jill