DIY Cuff Bracelets Made from Belts!

Transform old belts into stylish DIY cuff bracelets! Learn easy step-by-step instructions for upcycling fashion accessories at home. Dive into our DIY guide. See more fun leather jewelry tutorials on my Crafts page.

I love this super easy project, making DIY Cuff Bracelets from thrift store belts! I had this project in my old image files from a year or so ago and I thought I would revamp it with a fresh new tutorial
There are so many different types of bracelets you can make. I went through my old belt stash. I have had some belts since I was a teenager. Yikes. I used some pretty crazy-looking belts to make these cuff bracelets. My favorite is the leather one in the center. I wear it all the time.
Disclaimer: Please note that some of the links below are affiliate links and at no cost to you I will earn a commission if you purchase through those links. See my Disclosure + Privacy Policy for more info. As an Amazon Associate, I earn from qualifying purchases.
⚡️NOTICE: Submitting forms for FREEBIES on this site too quickly can trigger our email spam filters. If you stop receiving your Freebie Delivery Emails, please try using a different email address, an incognito window, or you can Contact us to whitelist your email so you can receive them.
This would be an easy way to make a unique handmade gift in minutes. Just punch a hole and add a snap and you are done! Here’s how to do it~

DIY Cuff Bracelets Made from Belts!
Supplies:
- Belts in different styles and textures
- Snap & Rivit Kit

- Silver Creek Maxi Punch Set
- Leather Punch Set {Some snap kits may come with a hole punch included}
- Hammer or Mallet
- Strip of Scrap Wood
- Ruler
- Heavy-duty Scissors

Instructions:
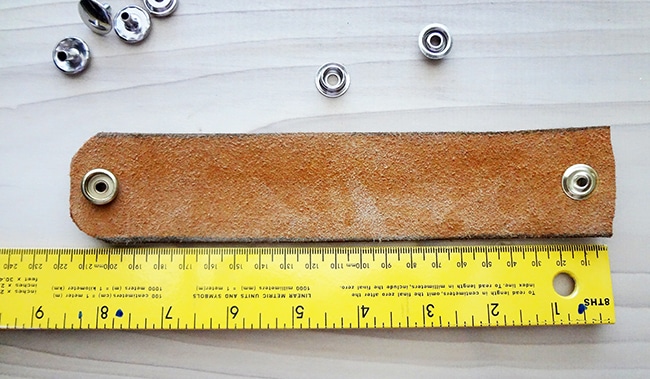
Cut down your belts with your scissors to the size of your wrist. Mine are 8 1/2 inches. Lay the snap on the cuff and determine where you want to place it on the belt and mark it with a pen.

Take your leather hole punch and place it over the mark and strike it with your hammer a couple of times to make a clean hole through the fabric.
Next, add your snap. Here’s my fast version for more details and an exact how-to to see the directions that came with your kit.
For the female fastener end.
Place the grommet of the snap into the hole of the belt.
Add the cap to the other side and place it in the rivet anvil (make sure you add the button snap to the right side of the fabric). Place the setter tool in the center and tap with your hammer.

For the male end of the snap, make your hole as before with your hole punch, insert the grommet, and tap with the setter.
Sound confusing? It isn’t hard, just go by the directions that come with your kit or find an easy video to go by. Trim the square end of the cuff so it has rounded corners, and that’s it!
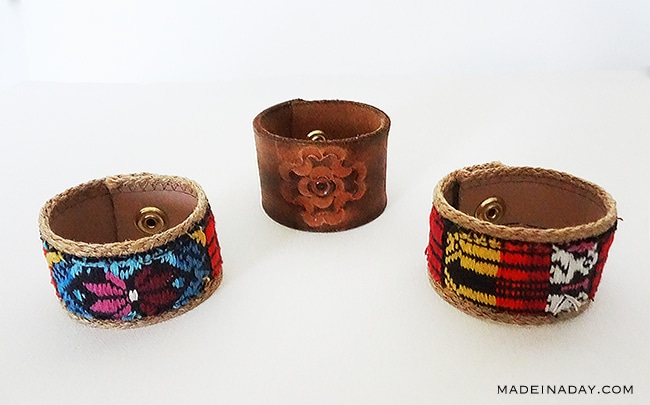
These cuff bracelets were really fun to make and would make a great gift, party treat bag trinket, or stocking stuffer.
Love it? Pin it!


What is the best size snap to use universally for leather tooled belts in order to make a bracelet?
Hi Christy,
The snaps I used on mine came in a kit with different sizes. The ones I liked best and used in this post were 15 mm or a little over a half-inch. I hope this helps.
Kim
I bought a kit and an old belt from the thrift store but the grommets don’t seem to fit the thickness of the belt. Do you know if they come in different sizes?
Thank you for your help Dianne Caplin
I bought my kit from Hobby Lobby and the rivets fit all my belts. Yes, the rivets do come in sizes if you have a thick belt you will need a rivet that fits the thickness. Most of the belts I added the snaps to were fabric or strap-like. The leather one is the thickest one. I hope this helps.
Kim
What size snaps are needed for this?
Hi Nan, the kit I used has a link to it in the supply list, it is an affiliate link to buy them, but they sell them at Hobby Lobby. The kit comes with two sizes I believe. I used the large ones around 3/4 inch. Hope this helps.
Kim
How did you adhere the edges and the loomed beadwork so that they don’t wrinkle when the cuff lays out flat. Great DIY!
Hi, There isn’t any loomed beadwork. These are made from belts, just added a little hot glue or fray adhesive to the edges so they do not fray. So far none of them have come apart and I am not getting any wrinkles. The belts are pretty stiff and stay that way when you cut them. Hope this helps.
Kim
I love those bracelets! the fact that these are recycled from a belt is also amazing!
glad i found your page from The Pin Junkie 2 Year Blogiversary Link Party! I’m pinning this!
I was just reading the instructions for the Cuff Bracelets and it mentions that there is a “kit” with instructions. I’m not sure where to get that …… can you help me out? This sounds like a fun project. :)
Hi Susan, I got mine at Hobby Lobby in the leather craft section. I am sure you can get one at Michaels or other craft stores that carry leather items. I’m glad you liked it!
These are great! What a great unexpected way to make bracelets. Now I can’t wait to go to the thrift shop and check out the belts. Saw your link on the Sits fb page today. :)
Luv this idea. I love finding things to upcycle and for inexpensive cost. Definitely sharing on Facebook. Thanks for sharing!
Wow, that actually does look really easy. Even I could make one. They’re so cute.
Great quick idea! Thanks for linking up with Turn it Up Tuesday!
I love these bracelets and you certainly made it look easy. Thanks for sharing with the Thursday Blog Hop!
This is so cool, I’ve never used that tool before but now I want one! I love shopping at the thrift store for things I can upcycle or reuse. Now following on FB and pinning and sharing this post on my FB page today. :)
What a brilliant idea! So many possibilities. I love the belts you chose too. Pinning this :)
I’ll have to remember this for my teen daughter to make for Christmas gifts.